


I have been knitting for a loooong time. Knitting newborn baby hats was a favourite thing that I did for years, just having fun and donating a bag full to the local hospital when I was in the area. I loved making all different hats from solids, to striped, to adding fair isle patterns, anything and everything.
When I had my youngest, I took a bag of hats to the hospital with me for the nurses to give to the new babies. They were so sweet, they tried to give me back one to put on my daughter when she was born. They tried to insist, but I told them not to worry, I brought 2 for her. 1 for immediately after she was born and a second for when she was all cleaned up, after her first bath. They were always so grateful for the bag of hats when I dropped them off.


For the most part, we knit hats from the bottom-up. This means that we need to know how big around the head we want it to be so we can decide how many stitches to cast on. You can be told how many stitches to cast on in the pattern you’re using. Or use the gauge on the yarn package to tell you how many stitches should be in an inch and multiply for your desired size. Or make a swatch, and figure out how many stitches you need.
I make swatches all the time!!! Most of the time, because I don’t usually use the needle size recommended on my yarn package so my stitches wont be the same size as the gauge on the package. (I like tighter knits so I tend to size down my needles.) I also have tons of small balls of yarn with no packages.
Knitting Gauges


In the image to the right, we can see the gauge squares which will be similar to those on your yarn package. The left square showing the info for knitting and the right square showing the info for crochet. Each shows the suggested hook or needle size inside their respective squares and will list the gauge for a 4″ x 4″ (10cm x 10cm) swatch.
For the image above, in knit, it shows 14 stitches (along the bottom) and 18 rows (along the right) in stockinette (knit 1 row, purl 1 row) to reach that number, with their recommended needle size.
Keep in mind, even using their suggested needle size if you knit really tight, or really loosely, this could be different for you. If you knit looser, your swatch will be bigger than the 4″ x 4″ square, and to correct for this, you should size down your needles and try again. If you knit tighter, your swatch will be smaller than 4″, you may want to size up your needles to account for this. As a beginner, this is the best option. If you’re more experienced, you could try adjusting the number of stitches in your pattern. This could depend, on the difficulty of the pattern you’re using, how successful you’ll be.
Planning your Hat
If you’re following a pattern, then you already know what your hat should look like. But if you can’t find a hat pattern that fits with your idea, you may need to make it up yourself. I’ll briefly explain below the sections of your hat and how to create a pattern, if you don’t have one.
There are 3 sections to your hat that you’ll need to plan: the brim (discussed below), the body, and the crown. The possibilities for each are endless. But as a beginner, let’s discuss some basics.
The Brim


Ribbed Brim
The most popular brim style is a ribbing. There are a few different ways to make ribbing. Knit 1, purl 1, or knit 2, purl 2 are the most popular. They will both keep the bottom edge of your hat nice and stretchy and will hold snugly to the ears.


Rolled Edge Brim
Another popular style, often for kids and babies, is a rolled brim. This one is created by knitting several rows, and it creates a super cute roll up. I’ve included a FREE download below, no email required, of this style of knit hat.
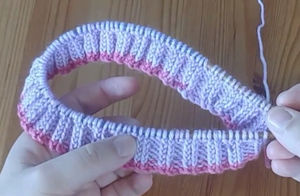
Double Thick Hat Brim


A third style, growing in popularity is a double thick hat brim, like this one. Its similar to the rolled edge, except that the cast on edge is then knitted or sewn inside to create a super warm, double thick hat brim.
Quick TIP: Use 1 size smaller needles to knit a ribbed brim to keep it tighter. Size up your needles for the body, and your hat will look more professional.
Once you decide on a brim style, then you can figure out how many stitches you will want to cast on to get you started. Keep in mind, you may adjust the number now, based on the numbers needed for the body. If you need only a couple more or less stitches, you can adjust at the end of the brim in a transition row before you start the body.

For example: your yarn label or swatch tells you that you need 62 stitches to get the correct size. But if you are going to start with 2×2 ribbing, you’ll need a multiple of 4 stitches, so you’ll actually want to cast on either 60 or 64. If you’re not sure which to choose, go with the slightly larger. It also may help to know what you’re planning to do with the body of your hat as well.


TIP: I’ve worked my ribbing over 48 stitches, and then increased by 2 on the first row of the body before starting the body pattern. You can adjust after the ribbing a little but I don’t recommend going more than 4-6 stitches, between the ribbing and body because it’ll throw off the fit. Also, spread the stitches out over the row, so increasing by 2, I’ll increase 1 at the beginning of the row, and 1 around the other side in the middle of the row somewhere.
Whichever brim style you choose you’re going to want about 1.5-2″ tall for the finished height. So if you’re making the double thick option, you’ll knit for about 4″ and fold it over to finish with 2″. This works the same if you just fold over the brim. For the rolled edge, its naturally a small edge which is perfect for a newborn or little kid hat.
Try this one below:
The Body of our Hat
Below, we’re going to discuss changing yarns, using stitch markers and working on double-pointed needles. Its designed to help with how to create a hat from scratch, without a pattern.


Over the last many years, I’ve made many for myself, my daughters, nephews & niece, in various patterns, from super simple like, the striped one below, to more complicated, like the snowflake or the braided cables.
I also made one a Star Wars theme from a graph that I adjusted to make fit on the hat I wanted to make. I even added a fleece lining to that one so you didn’t see all the colour changes and all the extra strings inside. The lining also made it super warm, as well.
Now, I don’t tell you that to say ‘Look at all the cool things I can do with a hat pattern’, but more like, ‘look at what you can do with a bit of imagination, and some mostly basic skills, to take a graph or idea and create something awesome.’

If you prefer to work with a pattern that’s ok too. I’ll include a link to purchase a nice simple one, for just $6 CAD.
How to Knit the Body of a Hat
So, we already finished our brim section. Now, we switch to a larger needle size.


If we continue knitting with our 4.0mm needles, our ribbing section will be wider than the body of the hat when sitting flat and looser around the bottom when its worn. It’s not completely necessary, but if you notice the bottom is looser, and you’d rather it not be like that, changing to a larger needle size will help.

For example, we casted on 100 stitches for this hat. For the ribbing, we required a multiple of 4 stitches, but our body is going to be a 6 stitch repeat, so a multiple of 6 is needed (102 stitches in this case). This means we need to increase on our first row by 2 stitches. (It’s also works if you decide to choose a number of stitches that works for both multiples, ie. 108 or 96)

Working with Double Pointed Needles
In the case of the hat above, we cast on to a round needle. But, at some point you’ll need to work your stitches onto double pointed needles, at a minimum, when your decreases make working on round needles too tight. In any case, you’ll want to work about 1/3 of your stitches onto each of 3 double pointed needles and use a 4th needle as the right needle.
I recommend keeping your pattern sections together, so for this hat, our pattern has a 6 stitch repeat, so I knit 30 or 36 stitches onto each of my first 2 needles, then the remainder onto the final one. As you’re working from one needle to the next, I move my hands around the previous or next needle as I’m working around in my circle. I will move a needle I’ve finished working on to the front so it is more out of the way, while working on the next. It can be a bit tedious as you get used to working with so many needles, especially if you’re used to crochet, but it’s well worth it, in my opinion.
Stitch Markers
I use stitch markers when making a hat, to signify the end of a row. This is an easy way to make sure you don’t miss the end of the row when working in the round. Normally, if you’re using a round needle, your stitch marker is fine in any location because it won’t fall off. Working on double pointed needles is a little different because likely you’ll finish a row at the end of one of your needles. So placing the marker there isn’t ideal because it’ll fall off when working around next time. So, I will often put my marker 1 stitch before the end of the row so it stays on.
Changing yarn colours
I discuss changing yarn colours in the video below. It’s much easier to watch, I think, but I’ll explain as well. When it’s time to change colours, I will hold onto the tail of the new yarn, drop the old, and begin knitting with the new colour. Then, when I get back around on the next row, to the spot I changed colours, the yarns will both be very loose. I just hold onto both tails, and continue knitting over top.
On the third row, you may still see some of that loosening, I just tighten the tails again as I work around. I will sometimes notice later that its created a small hole in my work, but when tightened and weaving in the ends stops it from continuing to happen.

So far you can:
– decide how many stitches to cast on for the size you require
– cast on
– create the ribbing
– how to correct for your proper stitch amount, between the ribbing and the body of the hat
– how to work on double pointed needles
– where and why we use stitch markers
– how to change colours
That’s a lot of knitting basics!
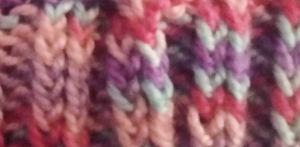
So for this hat, we’re knitting in a knit 5, purl 1 repeat around our rows. This gives us this beautiful vertical detail, along with the horizontal stripes, by adding the white. The variegated yarn used here is very busy, so I had hoped to tone it down a touch by adding a solid stripe.

This is a simple beginner pattern, so check it out in our shop for the full ad free pattern.
Keep on reading to learn how to shape the crown!
The Crown of your Hat


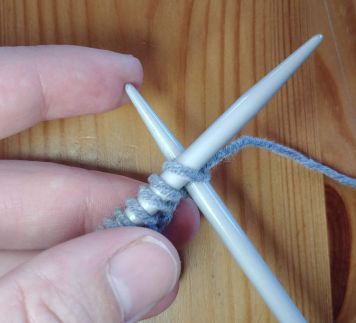
New Stitch – Decreasing with Knit 2 together (k2tog)
For this tutorial, we’re going to use a knit stitch called knit 2 together (which we used in our farmhouse dishcloth tutorial as well). Simply put, insert your needles into 2 stitches like a simple knit, but with both over your right needle, wrap your yarn, same as regular knit, and draw back through. Loop both stitches off your left needle. This creates a decrease where the first stitch disappears underneath the second. See the image below.


While shaping the crown, we want to stay in pattern as best we can, continuing to follow our knits and purls, until we have no choice but to eliminate the purls. See below.
For many patterns though, like cables, you may want to continue the cables, but make them smaller as you do your decreases, or choose the x pattern crown I did in another post.
Crown Shaping Pattern
Row 1: Decrease Needle Size, *k2tog, k3, p1* repeat from * around.
Row 2 & 3: *knit 4, p1* repeat around.
Repeat Rows 1-3, decreasing by 1 knit stitch in each repeat on each row.
When you get to decreasing over your k1, p1, row: k first st, then k2tog around (This moves the purl stitches underneath the knits and finishes it nicely).


When you have around 10-14 stitches left on your needles, cut your yarn leaving enough yarn to go through all remaining stitches and weave in, about 6” is plenty. Use a small crochet hook, or darning needle, to draw yarn through each stitch on your needles. Then thread it down the hole in the top of the hat, tighten it up, and weave in your ends.
Finishing it off
Now, you can add a pom pom or just weave in your ends. If you’d like an ad free version of this whole hat pattern, check it out in our store. Also, check out our video tutorial for more information on how to use your crochet hook to pull your yarn through the stitches on our needles. I also show you how to correct spaces in your work, small holes, from changing colours, etc. and how to attach a pom pom using our tail of the yarn at the top.

I hope this helps you with some of those hat fundamentals, and shows you how to move from a pattern, to creating your own. Thank you so much for learning with us. And I would love to see what you make with our tutorials! Please tag us on Instagram @purple.rose.crafts and we will share them to our stories!

