
Last time we talked about knitting a hat, we started with the ribbing, in this post. This time, we’re going to talk about fundamentals of working the body of our hat. Check out the final post in this series: the Crown of our hat. This is a beginner knitting tutorial where we discuss changing yarns, using stitch markers and working on double-pointed needles, but it also includes lots of information about how to create a hat from scratch, without a pattern.

Over the last many years, I’ve made dozens and dozens of knit hats. Many were donated to our local hospital for the newborn babies and others I made for myself, my daughters, nephews & niece, in various patterns, from super simple like, the striped one below, to more complicated, like the snowflake or the braided cables.
I also made one a Star Wars theme from a graph that I adjusted to make fit on the hat I was making. I even added a fleece lining to that one so you didn’t see all the colour changes and all the extra strings inside and it was super warm of course as well. Now, I don’t tell you that to say ‘Look at all the cool things I can do with a hat pattern’, but more like, ‘look at what you can do with a bit of imagination, and some mostly basic skills, to take a graph or idea and create something awesome.’
If you prefer to work with a pattern that’s ok too. I’ll include a link to purchase a nice simple one at the bottom, for just $2 CAD.
How to Knit the Body of a Hat
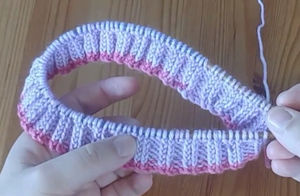
So, to begin our hat, we are creating our ribbing, and we started by casting on 100 stitches onto our 4.0 mm knitting needles. Then knitted 1.5-2″ of ribbing with k2, p2, using the neater ribbing method. Using our 4 weight yarn, this’ll give me a hat that is about 19″ around.
Now, we switch to a larger needle size.

If we continue knitting with our 4.0mm needles, our ribbing section will be wider than the body of the hat when sitting flat and looser around the bottom when its worn. It’s not completely necessary, but if you notice the bottom is looser, and you’d rather it not be like that, changing to a larger needle size will help.

For example, we casted on 100 stitches for this hat. For the ribbing, we required a multiple of 4 stitches, but our body is going to be a 6 stitch repeat, so a multiple of 6 is needed. This means we need to increase on our first row by 2 stitches. (It’s also works if you decide to choose a number of stitches that works for both multiples)
Working with Double Pointed Needles
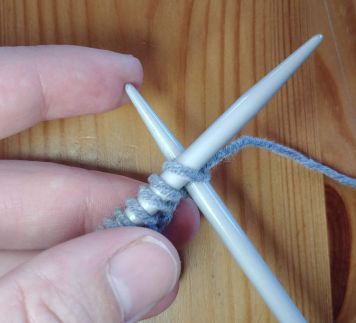
In this case of the hat above, we cast on to a round needle. But, at some point you’ll need to work your stitches onto double pointed needles, at a minimum, when your decreases make working on round needles too tight. In any case, you’ll want to work about 1/3 of your stitches onto each of 3 double pointed needles and knit onto a 4th needle.
I recommend keeping your pattern sections together, so for this hat, our pattern has a 6 stitch repeat, so I knit 30 or 36 stitches onto each of my first 2 needles, then the remainder onto the third. As you’re working from one needle to the next, I move my hands around the previous or next needle as I’m working around in my circle. I will move a needle I’ve finished working on to the front so it is more out of the way, while working on the next. It can be a bit tedious as you get used to working with so many needles, especially if you’re used to crochet, but it’s well worth it, in my opinion.

Stitch Markers
I use stitch markers when making a hat, to signify the end of a row. This is an easy way to make sure you don’t miss the end of the row when working in the round. Normally, if you’re using a round needle, your stitch marker is fine in any location because it won’t fall off. Working on double pointed needles is a little different because likely you’ll finish a row at the end of one of your needles, so placing the marker there isn’t ideal because it’ll fall off when working around next time. So, I will often put my marker 1 stitch before the end of the row so it stays on.
Changing yarn colours
I discuss changing yarn colours in the video below. It’s much easier to watch, I think, but I’ll explain as well. When it’s time to change colours, I will hold onto the tail of the new yarn, drop the old, and begin knitting with the new colour. Then, when I get back around my hat to the spot I changed colours, the yarns will both be very loose. I just hold onto the tails, and continue knitting over top. coming around the third row, you may still see some of that loosening, I just tighten the tails again as I work around. I will sometimes notice later that its created a small hole in my work, but when tightened and then weaving in the ends stops it from continuing to happen.
So far you can:
– decide how many stitches to cast on for the size you require
– cast on
– create the ribbing
– how to correct for your proper stitch amount, between the ribbing and the body of the hat
– how to work on double pointed needles
– where and why we use stitch markers

– how to change colours
That’s a lot of knitting basics!
Knitting the Body of your Hat
So for this hat, we’re knitting in a knit 5, purl 1 repeat around our rows. This gives us this beautiful vertical detail, along with the horizontal stripes, by adding the white. The variegated yarn used here is very busy, so I had hoped to tone it down a touch by using the solid stripes.
This is a simple beginner pattern, so check it out in our shop for the full ad free pattern.
Coming soon too, a knit hat round-up post, where I’ll include links to some of my favourite knit hat patterns! What are you looking for in a knit hat? Comment below! I’ll be addressing your challenges in the shaping your crown video coming soon!
Thanks for hangin’ out with me!
Much love,

