
Hey there! I am beyond excited to share this post with you today. Over the last several months I have been working on this pretty knit baby blanket. Now, I was always intimidated by knitting blankets.
Mostly, I think because knitting is a slower craft. So the idea of knitting a whole blanket seemed so daunting to me.
I’ve made so many crochet blankets over the years that it was time to shake off that ‘fear’ or intimidation and make a simple and easy one that you can do, too.
So, I set out to find some inspiration for what I wanted to create for you using simple stitches and easy principles so it stayed an easy level pattern.
This one is a favourite on my Etsy Boards. If you love it, click the image to check it out.
Check out my Pinterest Board for even more inspiration.
How I Created This Pattern
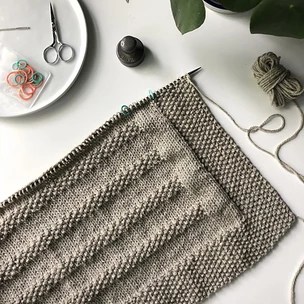
Once I settled on an idea, some stockinette squares, with a simple border around them, I needed to figure out how to put it together.
First, I made a swatch, using the needles I would use for the blanket, and the yarn. I made a 1 stockinette square swatch to test out my options. I ended up settling on broken rib stitch as my border and it turned out so pretty.

I honestly need to be pretty proud of my work to gift it. So, I will often rip it out if it doesn’t turn out the way I wanted it to. I actually did with this one, part way through the first set of stockinette squares of this blanket. I had made a mistake in how the edges of the squares looked when paired with the border sections. I am glad I did because I was able to correct a fatal flaw in the pattern. I hope makes it that much better for you!
So much texture! And the Caron Baby Cakes are so soft, I don’t even need to worry about washing it to make it soft enough to gift. This one is going to my cousin who’s having a baby next month.

Simple Knit Blanket Pattern

Blanket Size: 36” x 40”
Materials: Caron Baby Cakes in Aqua (4)
4.5mm round needle 24-30” long
10 small ring stitch markers
2 removeable markers (to mark our rows)
Abbreviations: knit (k), purl (p), slip as if to purl (S). Place Marker (PM).
If you want to make your blanket wider, you’ll cast on an extra multiple of 26 stitches and add extra stitch markers, as in cast on row below. You can also work your blanket longer by adding an extra full stockinette square (29 Rows), with an additional border section at the end (10 more rows) before casting off.
Instructions
Cast on 10, PM, CO 19, PM, CO 7, PM, CO 19, PM, CO 7, PM, CO 19, PM, CO7, PM, CO 19, PM, CO 7, PM, CO 19, PM, CO 10. (Total of 143) Bolded section shows the 5 squares you’ll see later.
Section 1: 10 rows of Broken Rib for the border:
Row 1: S, knit all to the last stitch, slipping markers, purl the last stitch.
Row 2: S, *k, p,* repeat to the end of the row.
Section 2: The body of the squares
Row 1: S, knit all to the last stitch, slipping markers, purl the last stitch.
Row 2: S, *K, P* to first marker, *Purl 19 to next marker; [k, p] repeat, to next marker;* repeat to final marker (ends with the p19), [k, p] repeat to end of the row.
Follow these 2 rows for 29 rows. (Place a removable marker every 10 rows, moving the lower one up the edge of the blanket as you work.)
Repeat Section 1 & Section 2, for a total of 6 squares, vertically, then finish with Section 1, before casting off, with a stretchy cast off.
I placed a removeable stitch marker every 10 rows along the starting edge. You can do this with just 2 markers, and move the lower one up the side. You may wish to mark the point that you are changing from section 1 to section 2, so mark the 10th row, then each 10 until you change back to section 1, and place the marker there. Honestly, once I was working though the pattern, I didn’t use the row markers, and just counted up the rows in each stockinette square and as I came to the end of each I began my border as needed.
Finishing It Off
When finished, I found that my blanket curled a little bit, but with a bit of blocking would be completely fine. Wet your project when finished and stretch it out gently. Allow to dry without shrinking by pinning in place, or placing something heavy on top so it cannot move while drying.
If you’re a little more advanced you could use the I-cord Bind off we used in our cast off post, and continue working it all the way around your blanket, picking up stitches along the sides. I discussed this in the video tutorial, but another creator showed exactly how to do this one all the way around in their video, which you can check out here. I’ll probably do this one in the future, but so far this is what we have.
Finally, I hope you love this tutorial and pattern as much as I do. If you’d like to have an ad free version of this pattern, check it out in our shop!
Watch the video tutorial for this one here:
Thanks for learning with us!
Much Love,


